This content of this site is still in development.
Setup Publishing For Your Website
Once you are ready to publish your website you will need to setup publishing. Publishing involved setting up 2 components in the Administration section of the your site. A Transport is the component that is used to establish a connection to the server where your website will be hosted. A Destination tells Cascade where to upload the files to on the specified server.
Things you need before you start!
- The NetID that owns the webspace for your URL. This is a departmental NetID not a personal NetID.
- The Password for the NetID
- The directory path for where you website should be located. This information is typically provide when you webspace is setup with IT or by your server administrator.
Transport
- Click the "Manage Site" menu item in the black toolbar at the top of the page.
- Select "Transports" from the left side menu.
- A list of created transfers will now be visible, or it will be blank if there aren't any yet. Click "+Add" in the top right.
- You will be prompted to select the Transport Type. Select "FTP and SFTP" and click Submit
- One the next screen you will be prompted to fill out the details of your Transport.
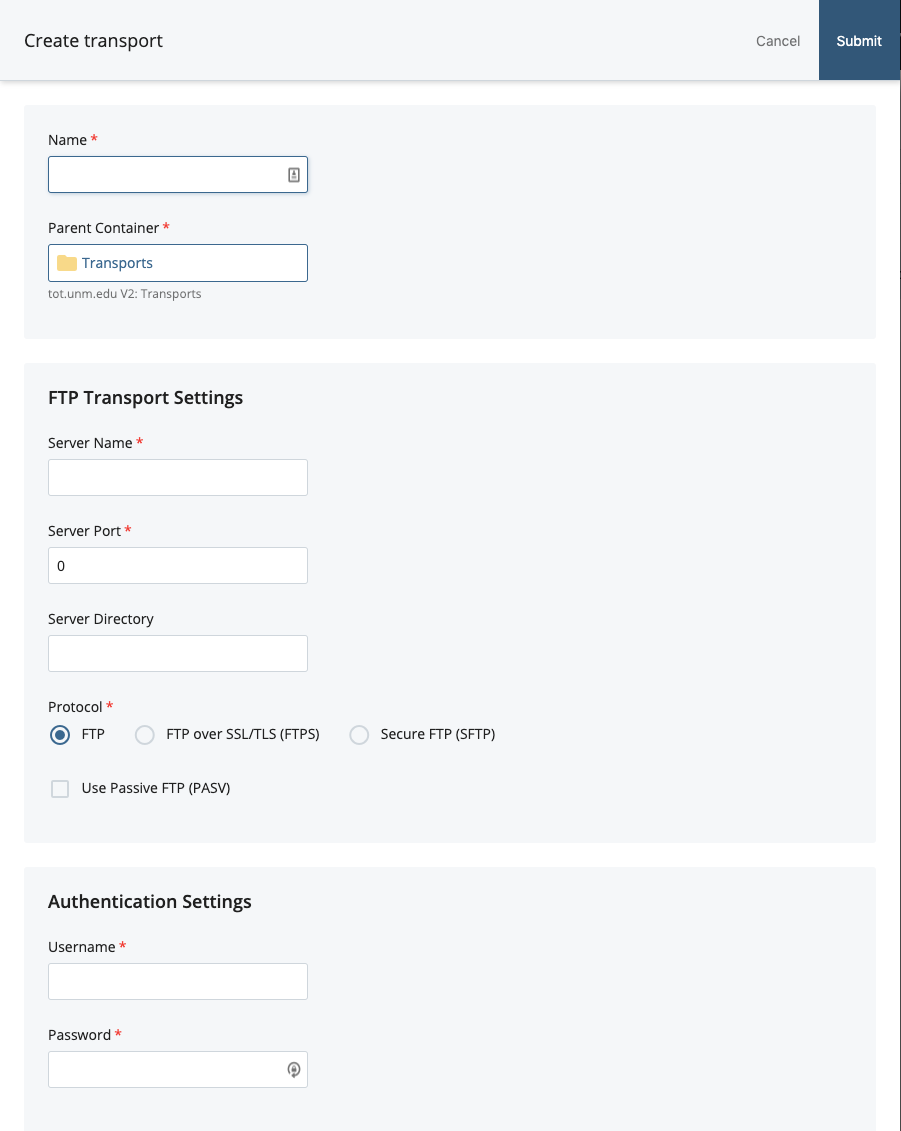
- Name - something for you to identify this Transport by
- Server Name - the server name or IP address you are connecting to. (i.e. ftp.unm.edu)
- Server Port - The port the remote server is listening on. 22 will likely be the most common port.
- Server Directory - it is recommended you leave this field blank
- Protocol - Secure FTP (SFTP), most servers should be using a secure connection and will require this field to be check.
- Username - The username to an account that has permission to publish to the website folder on the server
- Password - Fill in the password for the username used.
- Click Submit to finish
- If you see the message "Asset created successfully" you should see your new Transport highlighted in the left section of the screen

Destination
- Click the "Manage Site" in the toolbar at the top of the page.
- Select "Destinations" from the left menu menu.
- You should now see the "Destinations" section near the top right corner of the page click "+Add" and select "Destination"
- One the next screen you will be prompted to fill out the details of your Destination.
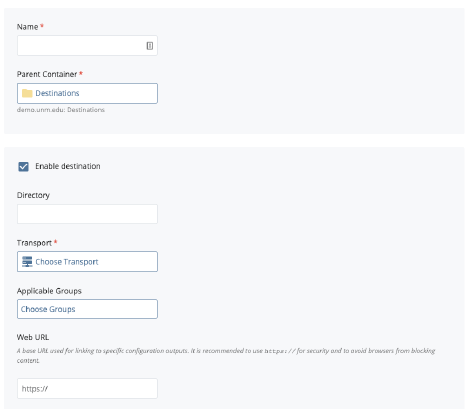
- Name - something for you to identify this Destination by
- Enable Destination - You must check the box next to "Enable destination" if you wish to be able to publish to this location. Generally you will also check the box for "Publish to this Destination by default" to enable this as a default publish location.
- Directory - The path to the folder in which the files for your website need to be uploaded. You must fill in this field if you left it blank on the Transport. The one exception is if the account you are connecting with defaults to the folder where the website files need to be uploaded.
- Transport - Click "Search" and select the Transport you created in the steps above.
- Web URL - The URL of your website
- There is not need to modify any of the other settings.
- Click Submit to finish
- If you see the message "Asset created successfully" you should see your new Destination highlighted in the left section of the screen
